
Manual of Drill and Ceremonial | Annexes A and B to Chapter 14 (Change 5)
A-DH-201-000/PT-000
- Annex A to Chapter 14 14A-1
- General 14A-1
- Quick march 14A-1
- Slow march 14A-1
- Stepping off 14A-1
- Marking time 14A-2
- Halting 14A-2
- Cease playing 14A-2
- Change of cadence 14A-2
- Annex B to Chapter 14 14B-1
- Figure 14-2-1 Drill Positions for Piccolo 14B-1
- Figure 14-2-2 Drill Positions for Clarinet and Oboe 14B-12
- Figure 14-2-3 Drill Positions for Bassoon 14B-13
- Figure 14-2-4 Drill Positions for Alto and Tenor Saxophone 14B-14
- Figure 14-2-5 Drill Positions for Baritone Saxophone 14B-15
- Figure 14-2-6 Drill Positions for French Horn 14B-16
- Figure 14-2-7 Drill Positions for French Horn When Wearing Sword/Bayonet 14B-17
- Figure 14-2-8 Drill Positions for Trumpet 14B-18
- Figure 14-2-9 Drill Positions for Trombone 14B-19
- Figure 14-2-10 Drill Positions for Euphonium 14B-10
- Figure 14-2-11 Drill Positions for Tuba 14B-11
- Figure 14-2-12 Drill Positions for Snare Drum and Tenor Drum (Side Slung) (A) 14B-12
- Figure 14-2-12 Drill Positions for Snare Drum and Tenor Drum (Side Slung) (B)
- Figure 14-2-13 Drill Positions for Snare Drum (Flat Mount) (A) 14B-14
- Figure 14-2-14 Figure 14-2-13 Drill Positions for Snare Drum (Flat Mount) (B)
- Figure 14-2-14 Drill Positions for Bass Drum (A) 14B-16
- Drill Positions for Bass Drum (B)
- Figure 14-2-15 Drill Positions for Cymbals 14B-18
- Figure 14-2-16 Drill Positions for Bagpipes (A) 14B-19
- Figure 14-2-16 Drill Positions for Bagpipes – PREPARE TO PLAY (B)
- Figure 14-2-17 Drill Positions for Piston Bugle and Bugle (A) 14B-21
- Figure 14-2-17 Drill Positions for Drum and Bugle Duty - Prepare to Play (B)
- Figure 14-2-18 Drill Positions for Fanfare Trumpet 14B-23
- Figure 14-2-19 Drill Positions for Bell Lyre 14B-24
- Figure 14-3-1/A Conductor – Starting a March at the Halt 14B-25
- Figure 14-3-1/B Conductor – Starting Without Drum Rolls
- Figure 14-3-2 Conductor – Conducting and Ending a March 14B-27
- Figure 14-3-3 Conductor – Baton Carriage 14B-28
- Figure 14-4-1 Basic Band Formation, Even Number of Files 14B-29
- Figure 14-4-2 Basic Band Formation, Odd Number of Files 14B-30
- Figure 14-4-3 Band Formation, Pipes and Drums 14B-31
- Figure 14-4-4 Band Formation, Corps of Drums/Fifes/Trumpets/Bugles 14B-32
- Figure 14-4-5 Standard Countermarch 14B-33
- Figure 14-4-6 Spiral Countermarch – Band With Even Number of Files 14B-34
- Figure 14-4-7 Spiral Countermarch – Band With Odd Number of Files 14B-35
- Figure 14-5-1 Drum Major’s Mace and Parade Cane 14B-36
- Figure 14-5-2 Drum Major – Basic Positions 14B-37
- Figure 14-5-3 Drum Major – Carry Position While Marching, and Rolling the Mace 14B-38
- Figure 14-5-4 Drum Major – Stepping Off Into the Carry in Quick Time 14B-39
- Figure 14-5-5 Drum Major – Stepping Off Into the Carry in Slow Time 14B-40
- Figure 14-5-6 Drum Major - Saluting 14B-41
- Figure 14-5-7 Drum Major – Stepping Off into the Trail 14B-42
- Figure 14-5-8 Drum Major – Changing from the Carry to the Trail in Quick Time: Viewed from the Left 14B-43
- Figure 14-5-9 Drum Major – Changing from Carry to the Trail in Quick Time: Viewed from the Right 14B-44
- Figure 14-5-10 Changing from the Carry to the Trail in Slow Time 14B-45
- Figure 14-5-11 Drum Major – Changing from the Trail to the Carry in Quick Time 14B-46
- Figure 14-5-12 Drum Major – Changing from the Trail to the Carry in Slow Time 14B-47
- Figure 14-5-13 Drum Major – Halting When Marching At the Trail 14B-48
- Figure 14-5-14 Drum Major – The State Walk in Slow Time 14B-49
- Figure 14-5-15 Drum Major – Walking the Mace in Quick Time 14B-50
- Figure 14-5-16 Drum Major – Stepping Off From the Halt 14B-51
- Figure 14-5-17 Drum Major – Mark Time (A) 14B-52
- Figure 14-5-17 Drum Major – Mark Time (B)
- Figure 14-5-18 Drum Major – Halting a Band 14B-54
- Figure 14-5-19 Drum Major – Commence Playing at the Halt 14B-55
- Figure 14-5-20 Drum Major – Commence Playing on the March 14B-56
- Figure 14-5-21 Drum Major – Cease Playing at the Halt (A) 14B-57
- Figure 14-5-21 Drum Major – Cease Playing at the Halt (B)
- Figure 14-5-22 Drum Major – Cease Playing on the March (A) 14B-59
- Figure 14-5-22 Drum Major – Cease Playing on the March (B)
- Figure 14-5-23 Drum Major – Simultaneous Halt and Cease Playing 14B-61
- Figure 14-5-24 Drum Major – Changing March Tempo 14B-62
- Figure 14-5-25 Drum Major – Right Wheel 14B-63
- Figure 14-5-26 Drum Major - Left Wheel (A) 14B-64
- Figure 14-5-26 Drum Major – Left Wheel (B)
- Figure 14-5-27 Drum Major – Standard Countermarch 14B-66
- Figure 14-5-28 Drum Major – Spiral Countermarch (A) 14B-67
- Figure 14-5-28 Drum Major – Spiral Countermarch (B)
- Figure 14-5-29 Drum Major – Common Coordination Signal 14B-69
- Figure 14-5-30 Drum Major – Circling the Mace and Dipping the Mace 14B-70
- Figure 14-5-31 Drum Major – Mark Time Signal for Massed Bands 14B-71
ANNEX A TO CHAPTER 14
GENERAL
- Standard drum signals are illustrated in Figures 14A-1 to 14A-4. Drum signals serve to reinforce or confirm visual signals, particularly on occasions when the latter might not be clearly seen or recognized by all band members. The bass drummer may act as an audible extension of the drum major’s visual signals while maintaining a judicious balance between audible cues and the music being played. Drum taps need not and should not be routinely employed as executive commands.
- Drum signals are used according to occasion and circumstances. On occasions such as during state and solemn ceremonies and funerals, the event commander, band conductor, or drum major may determine drum signals to be inappropriate to the tone and decorum of the occasion and order them not to be used. Bands shall routinely practice music and manoeuvre without the aid of drum signals.
- Pipes and drums and corps of drums musicians shall be acquainted with and use the drum signals in this Annex. March tempos peculiar to specific types of units when on their own parades are explained in Chapter 3, paragraphs 6 to 8. Instructions for funeral duties, including processional tempos, are in Chapter 11, Section 2.
QUICK MARCH
- When ordered to QUICK - MARCH, the drum section shall play the standard signal as illustrated in Figure 14A-1. Introductory drum rolls or beats may differ according to unit preference but shall be standardized when bands and drums and pipes of different units are combined or massed.

Figure 14A-1
SLOW MARCH
- When ordered to SLOW-MARCH, the bass drum shall play the signal as illustrated in Figure 14A-2.

Figure 14A-2
STEPPING OFF
- Upon recognizing the drum major’s signal for the band to step off, the bass drum shall play Figure 14A-3. The band shall step off as indicated by the drum major.
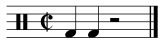
Figure 14A-3
MARKING TIME
- Upon recognizing the drum major’s signal for the band to mark time, the bass drum shall play Figure 14A-3. The band shall mark time as directed by the drum major.
HALTING
- Upon recognizing the drum major’s signal for the band to halt, the bass drum shall play
- Figure 14A-3, a signal for all band members to look to the drum major. The band shall halt as directed by the drum major. When and where appropriate, the drum major shall bring the mace down (on the left foot). Counting this left foot, the cadence is LEFT-RIGHT-LEFT–HALT.
CEASE PLAYING
- Upon recognizing the drum major’s signal for the band to cease playing, the bass drum shall play Figure 14A-4, a signal for all band members to look to the drum major. The drum major shall indicate the cease playing point when and where appropriate, normally on a left foot.

Figure 14A-4
CHANGE OF CADENCE
- Upon recognizing the drum major’s signal for the band to change cadence of march (from slow to quick or quick to slow), the bass drum shall play Figure 14A-3, a signal for all band members to look to the drum major. The band shall change cadence as directed by the drum major.
ANNEX B TO CHAPTER 14

CARRYING / ATTENTION

PLAYING

STAND AT EASE

STAND EASY
Figure 14-2-1 Drill Positions for Piccolo

CARRYING / ATTENTION

PLAYING

PLAYING (SIDE VIEW)

INTERMEDIATE 2

INTERMEDIATE 1

STAND AT EASE

STAND EASY
Figure 14-2-2 Drill Positions for Clarinet and Oboe

CARRYING / ATTENTION
PLAYING

INTERMEDIATE

STAND AT EASE

STAND EASY
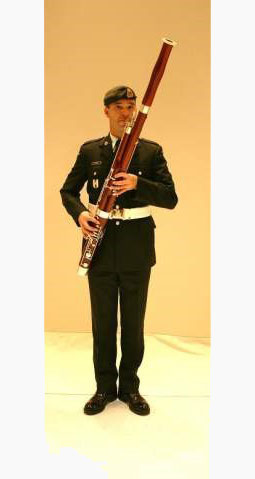
Figure 14-2-3 Drill Positions for Bassoon

CARRYING / ATTENTION

PLAYING

PLAYING (SIDE VIEW)

INTERMEDIATE

STAND AT EASE

STAND EASY
Figure 14-2-4 Drill Positions for Alto and Tenor Saxophone

CARRYING / ATTENTION

PLAYING

PLAYING (SIDE VIEW)

INTERMEDIATE

STAND AT EASE

STAND EASY

ALTERNATE STAND EASY
Figure 14-2-5 Drill Positions for Baritone Saxophone

CARRYING / ATTENTION

CARRYING / ATTENTION (SIDE VIEW)

PLAYING

INTERMEDIATE

STAND AT EASE / STAND EASY
Figure 14-2-6 Drill Positions for French Horn

CARRYING / ATTENTION

ALTERNATE CARRYING / ATTENTION

PLAYING

INTERMEDIATE

STAND AT EASE / STAND EASY

MARCHING
Figure 14-2-7 Drill Positions for French Horn When Wearing Sword/Bayonet

CARRYING / ATTENTION

INTERMEDIATE

PLAYING

PLAYING (SIDE VIEW)

STAND AT EASE

STAND EASY
Figure 14-2-8 Drill Positions for Trumpet

CARRYING / ATTENTION

INTERMEDIATE

PLAYING

PLAYING (SIDE VIEW)

STAND AT EASE

STAND EASY
Figure 14-2-9 Drill Drill Positions for Trombone

CARRYING / ATTENTION

CARRYING / ATTENTION SIDE VIEW

INTERMEDIATE

PLAYING

STAND EASY and STAND AT EASE
Figure 14-2-10 Drill Positions for Euphonium

CARRYING / ATTENTION

PLAYING

STAND AT EASE (INSTRUMENT UP)

ATTENTION (INSTRUMENT DOWN)

STAND AT EASE / STAND EASY (INSTRUMENT DOWN)
Figure 14-2-11 Drill Positions for Tuba

CARRYING / ATTENTION

CARRYING / ATTENTION (SIDE VIEW)

PLAYING

MARCHING WHILE NOT PLAYING
Figure 14-2-12 Drill Positions for Snare Drum and Tenor Drum (Side Slung) (A)

STAND AT EASE

STAND EASY

STAND EASY / DRUM GROUNDED
Figure 14-2-12 Drill Positions for Snare Drum and Tenor Drum (Side Slung) (B)

CARRYING / ATTENTION

CARRYING / ATTENTION (SIDE VIEW)

PLAYING

MARCHING WHILE NOT PLAYING
Figure 14-2-13 Drill Positions for Snare Drum (Flat Mount) (A)

STAND AT EASY

STAND EASY

STAND EASY / DRUM GROUNDED
Figure 14-2-13 Drill Positions for Snare Drum (Flat Mount) (B)

CARRYING / ATTENTION

CARRYING / ATTENTION (SIDE VIEW)

PLAYING

STAND AT EASE

STAND AT EASE (SIDE VIEW)
Figure 14-2-14 Drill Positions for Bass Drum (A)

MARCHING WHILE NOT PLAYING

ATTENTION FOR INSPECTION

STAND AT EASE

STAND EASY
Figure 14-2-14 Drill Positions for Bass Drum (B)

CARRYING / ATTENTION

PLAYING

PLAYING (SIDE VIEW)

STAND AT EASE and STAND EASY
Figure 14-2-15 Drill Positions for Cymbals
CARRYING / ATTENTION

CARRYING / ATTENTION (side view)

PLAYING

PLAYING (side view)

STAND AT EASE

STAND EASY
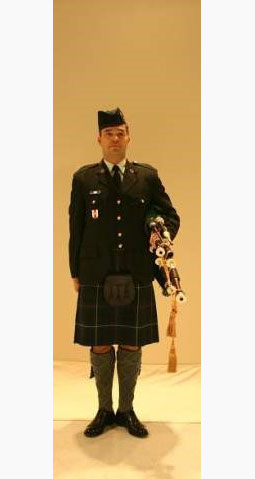
Figure 14-2-16 Drill Positions for Bagpipes (A)

1 PIPES-READY

2 PIPES-UP

3 CUT/ DRUM TAP
Figure 14-2-16 Drill Positions for Bagpipes – PREPARE TO PLAY (B)

CARRYING (WITH FEET PART AT EASE)

STAND EASY

INTERMEDIATE

PLAYING
Figure 14-2-17 Drill Positions for Piston Bugle and Bugle (A)

READY

ATTENTION / UP

READY

ATTENTION / UP
Figure 14-2-17 Drill Positions for Drum and Bugle Duty - Prepare to Play (B)

ATTENTION

PLAYING

PLAYING (SIDE VIEW)

STAND AT EASE and STAND EASY
Figure 14-2-18 Drill Positions for Fanfare Trumpet

PLAYING

CARRYING / ATTENTION (SIDE VIEW)

STAND AT EASE

STAND EASY
Figure 14-2-19 Drill Positions for Bell Lyre

ROLLS ARE IMMINENT -- “QUICK --”

“MARCH”

PLAY
Figure 14-3-1/A Conductor – Starting a March at the Halt

PREP FOR INSTRUMENTS UP

BRINGING INSTRUMENTS UP

ALL INSTRUMENTS ARE UP
Figure 14-3-1/B Conductor – Starting Without Drum Rolls

CONDUCTING POSITION

BINDICATING DOUBLE TAP IS IMMINENT

INDICATING TO PLAY DOUBLE TAP

CUT OFF POSITION

PREP FOR INSTRUMENTS DOWN

INSTRUMENTS DOWN
Figure 14-3-2 Conductor – Conducting and Ending a March

ATTENTION (baton in right hand, extended down leg)

MOVE BATON FROM HAND TO HAND

ATTENTION (baton in left hand, extended up arm)

MARCHING (baton in left hand, extended up arm)
Figure 14-4-3 Conductor – Baton Carriage

Figure 14-4-1 Basic Band Formation, Even Number of Files
NOTE
Conductors and drum majors may adopt other positions according to circumstances and the nature of the duty.

Figure 14-4-2 Basic Band Formation, Odd Number of Files
NOTE
Conductors and drum majors may adopt other positions according to circumstances and the nature of the duty.

Figure 14-4-3 Band Formation, Pipes and Drums

Figure 14-4-4 Band Formation, Corps of Drums/Fifes/Trumpets/Bugles

Figure 14-4-5 Standard Countermarch

Figure 14-4-6 Spiral Countermarch – Band With Even Number of Files

Figure 14-4-7 Spiral Countermarch – Band With Odd Number of Files

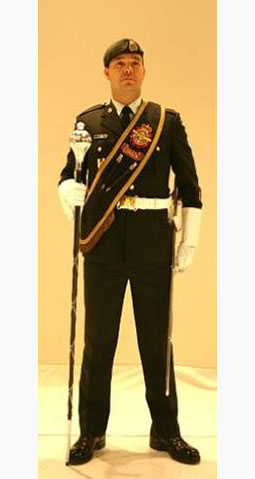
Figure 14-5-1 Drum Major’s Mace and Parade Cane

ATTENTION
STAND AT EASE

STAND EASY

ATTENTION AT THE CARRY
Figure 14-5-2 Drum Major – Basic Positions


Figure 14-5-3 Drum Major – Carry Position While Marching, and Rolling the Mace

1

2

3

4
Figure 14-5-4 Drum Major – Stepping Off Into the Carry in Quick Time

1

2

3
Figure 14-5-5 Drum Major – Stepping Off Into the Carry in Slow Time

AT THE HALT

MARCHING – SALUTING TO THE FRONT

MARCHING – SALUTING TO THE RIGHT

MARCHING – SALUTING TO THE LEFT
Figure 14-5-6 Drum Major - Saluting

1

2

3

4
Figure 14-5-7 Drum Major – Stepping Off into the Trail

1 LEFT

2 RIGHT


3 LEFT / CUT

4 RIGHT

5 LEFT

6 RIGHT

7 LEFT

8 RIGHT

9 LEFT
Figure 14-5-8 Drum Major – Changing from the Carry to the Trail in Quick Time: Viewed from the Left

1 LEFT

2 RIGHT


3 LEFT / CUT

4 RIGHT

5 LEFT

6 RIGHT

7 LEFT

8 RIGHT

9 LEFT
Figure 14-5-9 Drum Major – Changing from Carry to the Trail in Quick Time: Viewed from the Right

1

2

3

4

5

6
Figure 14-5-10 Changing from the Carry to the Trail in Slow Time

1

2

3

4

5

6

7
8

9
Figure 14-5-11 Drum Major – Changing from the Trail to the Carry in Quick Time

1

2

3

4
Figure 14-5-12 Drum Major – Changing from the Trail to the Carry in Slow Time

1

2

3

4

5
Figure 14-5-13 Drum Major – Halting When Marching At the Trail

Sixth Pace

Seventh Pace – First Movement


Seventh and Eighth Paces – First Movement

Ninth Pace – Second Movement

Tenth Pace – Third Movement

Eleventh Pace

Twelfth Pace (and like Sixth Pace)
Figure 14-5-14 Drum Major – The State Walk in Slow Time

Eighth Pace

Tenth Pace –First Movement

Eleventh Pace – Second Movement

Twelfth Pace – Third Movement

Thirteenth Pace

Fourteenth Pace (and like Tenth Pace)
Figure 14-5-15 Drum Major – Walking the Mace in Quick Time

1

2

3
4

5

6

7

8
Figure 14-5-16 Drum Major – Stepping Off From the Halt

1

2

3

4
Figure 14-5-17 Drum Major – Mark Time (A)

5

6

7

8
Figure 14-5-17 Drum Major – Mark Time (B)

1

2

3

4
5

6

7

8

9

10
Figure 14-5-18 Drum Major – Halting a Band

1

2

3

4

5
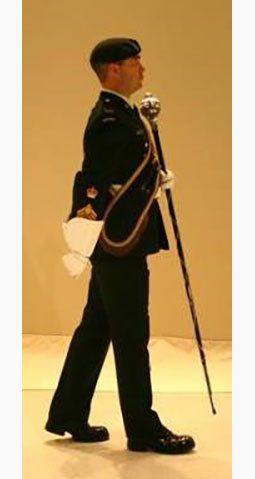
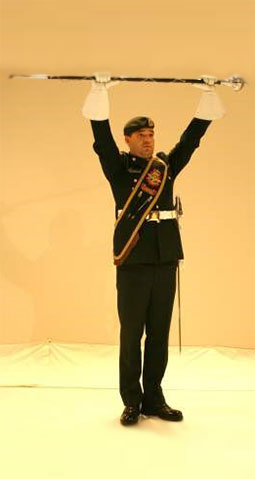
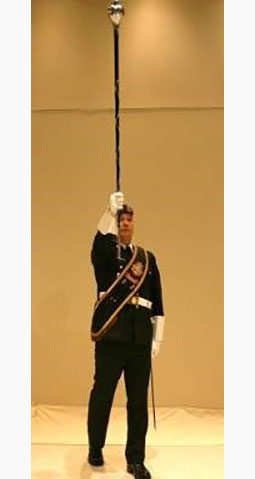
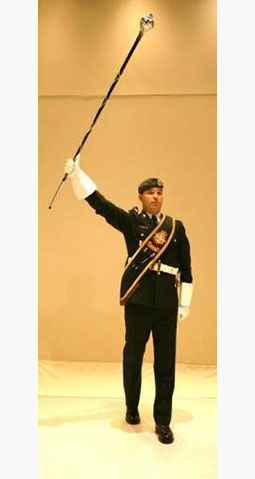
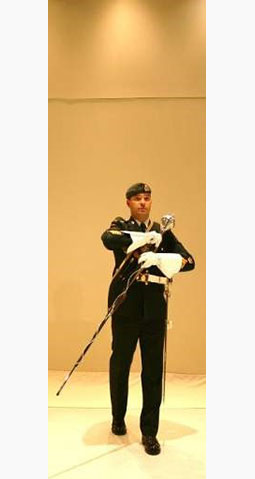
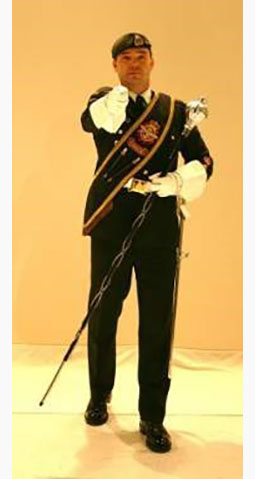
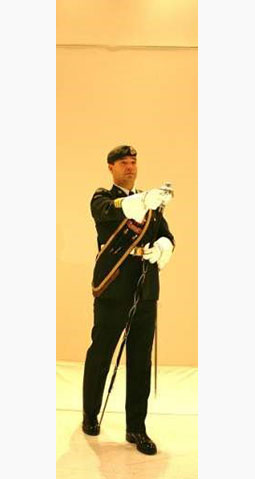
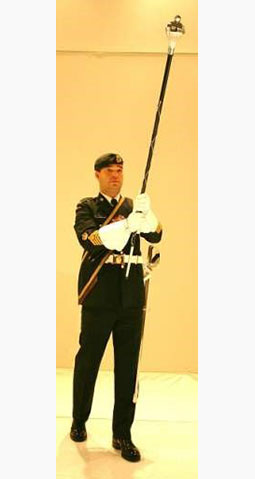
Figure 14-5-19 Drum Major – Commence Playing at the Halt

1

2

3

4

5

6

7
Figure 14-5-20 Drum Major – Commence Playing on the March

1

2

3

4

5
Figure 14-5-21 Drum Major – Cease Playing at the Halt (A)

6

7

8
Figure 14-5-21 Drum Major – Cease Playing at the Halt (B)

1

2

3

4
Figure 14-5-22 Drum Major – Cease Playing on the March (A)
5

6

7
8

9
Figure 14-5-22 Drum Major – Cease Playing on the March (B)

1

2

3

4

5

6

7

8

9

10
Figure 14-5-23 Drum Major – Simultaneous Halt and Cease Playing

1

2

3

4

5

6

7
Figure 14-5-24 Drum Major – Changing March Tempo

1

2

3

4

5

6
7
Figure 14-5-25 Drum Major – Right Wheel

1

2

3

4

5
Figure 14-5-26 Drum Major - Left Wheel (A)

6

7

8

9

10

11
Figure 14-5-26 Drum Major – Left Wheel (B)

1

2

3

4

5

6

7

8

9
Figure 14-5-27 Drum Major – Standard Countermarch
1

2

3

4
5

6
Figure 14-5-28 Drum Major – Spiral Countermarch (A)

7

8

9

10

11

12
Figure 14-5-28 Drum Major – Spiral Countermarch (B)

AT THE HALT
Figure 14-5-29 Drum Major – Common Coordination Signal

1

2

3

4

5

6

7

8

9
Figure 14-5-30 Drum Major – Circling the Mace and Dipping the Mace

1

2

3

4

5

6

7

8

9

10

11
Figure 14-5-31 Drum Major – Mark Time Signal for Massed Bands
Page details
- Date modified: