
A Museum’s How-to Guide for Digitizing Audio
Ern Bieman
Disclaimer
The information in this document is based on the current understanding of the issues presented. It does not necessarily apply in all situations, nor do any represented activities ensure complete protection as described. Although reasonable efforts have been made to ensure that the information is accurate and up to date, the publisher, Canadian Heritage Information Network (CHIN), does not provide any guarantee with respect to this information, nor does it assume any liability for any loss, claim or demand arising directly or indirectly from any use of or reliance upon the information. CHIN does not endorse or make any representations about any products, services or materials detailed in this document or on external websites referenced in this document; these products, services or materials are, therefore, used at your own risk.
Table of contents
- List of abbreviations
- Guide description
- Introduction
- Basic concepts and terms for digital audio sampling
- Basic terms for audio bit stream encoding, storage and transmission
- Summary of recommended audio settings, codecs and file formats
- Equipment selection and set-up
- Software selection
- Digitization workflow overview
- Acknowledgements
- Glossary
- Bibliography
- Further reading
List of abbreviations
- ADC
- analogue to digital converter
- BWF
- Broadcast Wave Format
- CCI
- Canadian Conservation Institute
- CHIN
- Canadian Heritage Information Network
- CMS
- collections management system
- GiB
- gigibyte
- kb/s
- kilobits per second
- KiB
- kibibyte
- NPTAC
- The National, Provincial and Territorial Archivists Conference
- RH
- relative humidity
- WAV
- Wave Audio File Format
Guide description
This guide produced by the Canadian Heritage Information Network (CHIN) is primarily intended for Canadian museum professionals, who will find the sections Step 3: Catalogue and create metadata and Step 8: Archive most useful. However, the guide may be valuable to anyone wishing to undertake a process of digitizing cultural heritage audio. The document provides hands-on examples of how to convert analogue electronic audio to a digital format by using budget-conscious equipment and software in a Windows PC operating environment. It supports and builds on the Canadian Conservation Institute’s (CCI’s) Technical Bulletin 30 The Digitization of Audiotapes, and it furthers discussion on digitization and the digital preservation workflow. Because of the technical foundation provided by Technical Bulletin 30, readers are encouraged to consult that document before following the steps in this guide.
Introduction
Currently, all analogue electronic media is nearing its end of life. The magnetic tape, an obsolete media for close to 20 years, degrades in spite of our best efforts to conserve it. Quality playback equipment is becoming scarce, even on the used market. If your goal is to conserve the physical carrier as a heritage object, you may consult CCI’s Caring for Audio, Video and Data Recording Media, but if your goal is to preserve the information contained on these old carriers, you must convert this information to a digital format as soon as possible. As time passes, no amount of conservation will prevent the analogue signal on these older carriers from being lost.
Once the content has been digitized, long-term access will be more easily managed through digital preservation best practices, some of which are mentioned in this guide. Further information on digital preservation can be found in CHIN’s Digital Preservation Toolkit. Upon preserving the digital reproduction, the older analogue carriers can be deaccessioned, or if desired, some may be saved as representative samplings of the older format, making the older carriers themselves the heritage object rather than the content they once held.
Basic concepts and terms for digital audio sampling
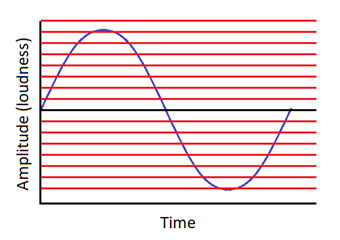
Sound is the compression and decompression of a physical medium as it is interpreted by our auditory system. This can be represented in a graph as a wave, with amplitude on the vertical axis of the graph and time on the horizontal axis (Figure 1a). Louder sounds have greater amplitudes, and higher pitched (higher frequency) sounds have more oscillations over a given time period.
Sound frequency is measured in Hertz; a sound wave that oscillates 5000 times per second is said to have a frequency of 5000 Hz or 5 kHz. Humans can hear in the range of around 20 Hz to 20 kHz.

© Government of Canada, Canadian Heritage Information Network. 135044-0001
Figure 1a. Graph of a sound wave.
Sample rate
To create a digital reproduction of a sound wave, samples must be taken. Each digital sample approximates the wave’s height at that point in time as a single numeric value. The number of times a sample is taken over a fixed period of time is called the sample rate (Figure 1b). As with wave frequencies, sample rates are measured in Hertz or the number of times sampled per second. A sample rate of 40 kHz, for instance, indicates that 40,000 samples were taken in a single second. The Nyquist-Shannon sampling theorem stipulates that the minimum sampling frequency of a signal that does not distort the underlying information must be double the frequency of the highest frequency component. This means that to accurately sample a regular sine wave, at least two samples per cycle are needed. Thus, if humans can hear frequencies as high as 20 kHz, at least double that number of samples (40 kHz) must be taken to capture all audible information. When sound samples are manipulated (either to edit, transfer across different systems or migrate to various formats), information is lost; thus, more than double the anticipated number of samples per second is required. CHIN supports and follows audio digitization recommendations (PDF format) made by the National, Provincial and Territorial Archivists Conference (NPTAC) Audiovisual Working Group. In the case of sample rates, NPTAC recommends 96 kHz as ideal and 48 kHz as acceptable.

© Government of Canada, Canadian Heritage Information Network. 135044-0003
Figure 1b. Sample rate. Each vertical line indicates a point in time when the wave has been sampled. In this graph, 18 samples were taken over one cycle of the underlying sound wave, which is far more than is necessary for a wave of this frequency.
Bit depth
The number of bits used to record each sample is referred to as bit depth. Because each sample represents the height of the wave (loudness) at that point in time, more bits in a sample will yield a more accurate representation of the underlying wave’s loudness (Figure 1c). For instance, if only two bits (binary digits) per sample were used, then the sample could only represent four possible loudness positions: 00, 01, 10 and 11. In general, a bit depth of n will allow 2n different vertical sample positions. Samples with insufficient bit depth will either fail to record louder components of a wave or fail to pick up nuances in quieter sections.
The NPTAC Audiovisual Working Group recommends using a bit depth of 24 for all audio recordings.
© Government of Canada, Canadian Heritage Information Network. 135044-0005
Figure 1c. Bit depth. In this graph, there are 16 horizontal lines (vertical positions), which would require 4 bits (24 = 16). If the wave does not fall on a line at the moment the sample is taken, then the nearest line is used to approximate the wave’s loudness.
The trade-off between sample accuracy and file size
It is important to note that while higher sample rates and bit depths will increase the accuracy of your recording, it does so at the expense of file size. Higher bit depth and sample rates are needed for more complex recordings, such as music, but may not be needed for simple recordings, such as a conversation. As indicated in Figure 1d, the samples (shown as dots) must always fall on a vertical line (determined by the sampling rate) and a horizontal line (determined by bit depth). The samples are close to the underlying wave but in general do not fall exactly on it.
Setting sample rates and bit depths higher than those recommended by NPTAC may increase the accuracy of the recording; however, there are two reasons why doing so is not advisable. First, the increased accuracy may not be audible; and second, the samples themselves may contain no additional information if the supporting hardware is not of sufficiently high quality.

© Government of Canada, Canadian Heritage Information Network. 135044-0007
Figure 1d. Sampling values based on bit depth and sampling frequency.
Audio channels
An audio signal may be made up of more than one channel. Most recordings are either mono (a single channel) or stereo (two channels), although some recordings have more. Digital audio recordings of multiple channels can be made simultaneously, as will be the case for demonstrations in this guide, or separately, as may be done when creating and recording music in a studio. The number of audio channels used for digitization should match the number of separate audio channels found in the original analogue recording.
Basic terms for audio bit stream encoding, storage and transmission
Sampling rate, bit depth and audio channels are all terms used to describe the nature and quality of a digital audio signal. Other terms can be used to describe the way in which the signal is encoded (a codec) or the format that is used to describe and contain that signal (a wrapper or file format).
Codec
A codec is a set of instructions (a method or process) for encoding and decoding information to and from a stream of binary digits, typically for digital audio or video. Software or hardware designed for carrying out this process might also be referred to as a codec. The bit stream that is produced or decoded by a codec may be transmitted (for instance, across the internet as streamed audio) or stored in a file.
Codecs suitable for recording and long-term storage should be lossless – in other words, capable of encoding and decoding audio without losing information when it is edited, stored or transmitted. The lossless codec currently recommended for digitizing audio is linear pulse code modulation (LPCM or PCM).
File formats, containers and wrappers
An audio bit stream cannot be used without additional information to indicate what the stream is and how to use it. This additional information is often added to the front of the bit stream and is known as a wrapper. If the wrapper contains more than a single form of media (audio, video and descriptive text, for instance), it is referred to as a container. If either the wrapper or container is stored as a file, as opposed to being transmitted across a network, the resulting standard used to save this information is known as a file format. The terms wrapper, container and file format are often used interchangeably, although strictly speaking wrappers contain a single form of media, containers hold multiple forms and when either of these are saved to storage, the standard by which they are saved is a file format.
Sometimes a particular wrapper, container or file format is closely associated with a specific codec and both the bit stream within the file and the file itself are loosely referred to by the same name. Note that they are indeed different things and that many audio file formats will accept bit streams created by different codecs.
File formats suitable for holding audio for long-term storage should accept lossless codecs and allow some descriptive metadata in their headers. The recommended file format for digitizing audio is Broadcast Wave File (BWF), although Waveform Audio File Format (WAV) is also acceptable. The added difference with BWF is that this format carries more metadata than is found in a traditional WAV file.
Summary of recommended audio settings, codecs and file formats
The following is a summary of the recommended settings discussed to this point:
- File format: BWF is ideal, WAV is acceptable
- Codec: LPCM
- Sample Rate: 96 kHz is ideal (for high-fidelity recordings), 48 kHz is acceptable (suitable for interviews and low-quality recordings)
- Bit depth: 24 bits for all recordings
- Audio channels: use hardware, software and settings to play and record the number of audio channels available in the original audio recording
Equipment selection and set-up
The following discussion is for stereo recordings, although the recommended settings will work for mono recordings as well. Recordings for more than two audio channels will require additional hardware that is beyond the scope of this document.
Playback equipment
Playback equipment for a number of analogue electronic audio formats (eight-track and reel-to-reel in particular) is available only on the used market. You can purchase new cassette tape players, but be sure the tape player has a stereo-out option such as a headphone jack or stereo RCA audio-out connectors.
Computer for capturing and editing digital audio
Any computer that is capable of running a current version of Windows is appropriate (in terms of memory and processing power) for running sound editing software. However, the standard sound processing hardware on most computers is typically insufficient, and methods of how to address this are discussed in the next section, Sound conversion hardware. Depending on how much audio or other media is being stored on the computer’s onboard drive, storage space may also be a limiting factor, and ordering a computer with a larger drive or adding an external drive may be necessary. Further information on storage requirements can be found in the section Understanding storage space.
Sound conversion hardware
The existing onboard sound hardware on most computers typically cannot receive a stereo-in signal (a microphone jack is a single “mono” channel) and will likely not meet the sample rates and bit depths recommended by NPTAC. In such cases, assuming you choose to perform the digitization work in-house (and not hire a professional service), there are three options:
- Using analogue to digital converters,
- Upgrading the onboard sound hardware and
- Using factory-supplied onboard sound hardware.
Analogue to digital converters
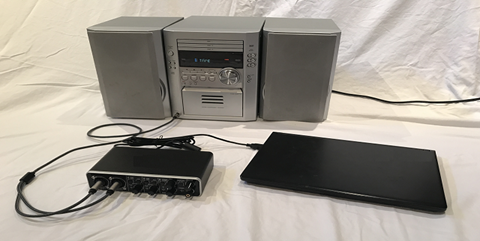
The first and most recommended option for appropriate sound conversion hardware is to bypass your computer’s onboard sound hardware by using an external audio analogue to digital converter (ADC) (Figure 2a). These converters typically connect to your playback device’s line-out ports, RCA audio-out ports or headphone jack port, then to your computer’s USB port (Figure 2b). Always select audio-out options from your playback device in the following order: optical audio out (if available), line out (typically RCA ports), stereo headphone out. When the driver is installed and the ADC is plugged into the computer, the device will be detectable by your sound recording and editing software as an audio source.
External ADCs are not susceptible to interference by your computer’s motherboard or its other components and are likely to provide the best quality. Converters that fully meet NPTAC’s recommendations start at $200 (CAN) and can cost considerably more. Verify the published technical specifications of the ADC before purchasing.

© Government of Canada, Canadian Heritage Information Network. 135044-0009
Figure 2a. Older high-end cassette tape deck using a professional ADC capable of sampling at NPTAC’s highest recommendations. ADCs of this quality typically require driver installation.

© Government of Canada, Canadian Heritage Information Network. 135044-0010
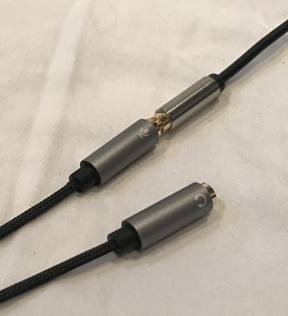
Figure 2b. Detail of cabling used to connect the ADC and cassette tape deck in Figure 2a. Note the additional jacks used to convert from RCA male to 1/4-inch line-in male. These jacks were required as the ADC being used did not have an RCA audio-in port.
Connecting audio devices will require an understanding of how audio jacks are designed. The most common is a single-pronged jack that has multiple components separated by insulators. Figure 3b, for instance, shows a TRS (tip, ring, sleeve) jack adapter that can carry two audio signals, typically a left and right channel. The tip carries the first channel; then a black ring insulates the tip from the second channel carried in the metal ring behind the tip; then a second black insulator separates this from the third metal section, a larger sleeve section which serves as the ground. TS jacks, by comparison, have only a tip and sleeve and are designed to carry a single audio channel. Smaller TRRS jacks commonly found on computer headsets carry two audio channels (for the headphones) and a single (mono) audio channel for a microphone.
© Government of Canada, Canadian Heritage Information Network. 135044-0011
Figure 3a. Using the cassette tape deck’s headphone port when line-out ports are unavailable. This set-up uses a splitter cable from the cassette tape deck’s headphone jack, which produces two separate (left and right) mono channels.

© Government of Canada, Canadian Heritage Information Network. 135044-0012
Figure 3b. TRS adapter to be used if your playback device has a larger headphone jack port. This adapter allows a 1/4-inch port to accept a 3.5 mm jack.
Lower-end ADC devices that do not meet NPTAC’s specifications can be had for $50 CAN (Figure 4), and these will allow you to capture stereo signals, where a typical audio jack on your computer will not. However, the sample rate of these devices is typically only good enough to capture voice, and the bit depth is generally not at the recommended 24 bits. If your equipment is unable to capture recordings at recommended standards, keep the original media until its content can be fully captured.

© Government of Canada, Canadian Heritage Information Network. 135044-0013
Figure 4. Cassette tape deck using a basic ($50) audio ADC. This configuration will not capture audio at NPTAC’s recommended levels but may still allow the basic capture of a stereo signal.
Upgrading onboard sound hardware
The second sound conversion hardware option (for desktop or tower “under the desk” computers) is to replace or bypass the existing sound card with a higher-end model. While more affordable than a fully compliant external ADC, internal sound cards may still be susceptible to interference by surrounding computer components. Sound cards that meet NPTAC’s standards start at $100 (CAN). Installing one should be done by someone with technical knowledge, as your computer will need to be opened. Consult the technical specifications of the replacement card to ensure it meets NPTAC’s recommendations for bit depth and sample rates. The replacement card should also have a method of receiving a stereo signal. This is typically through two (or more) line-in or audio-in ports, but it may also be via an optical audio-in port. Cabling to connect your playback device to such a sound card varies. If optical audio is possible (for both the playback device and the sound card), choose this. Otherwise, use line-out/line-in connectors, or if your playback device does not have line-out connectors, use its headphone port.
Using factory-supplied onboard sound hardware
The third and most affordable option is to use the existing onboard sound hardware to digitize at a level that does not meet NPTAC recommendations, and as such, is not advisable. However, it is recognized that budgets may limit you to a recording set-up such as this. If your original media is all single channel recordings (off a single microphone, for example) and this media consists of voice only (interviews), the computer’s onboard sound processing hardware can typically sample up to 48 kb/s, which is acceptable. However, the 16-bit depth samples will still fall short of NPTAC’s 24-bit recommendations. Depending on the nature of the original media, this may not be an issue. Nevertheless, it is advisable to consider the other two options first or to hire a professional service before proceeding. As with any configuration that cannot capture audio at the recommended levels, you should not deaccession the original media.
If you do use such a set-up, your computer may have a separate microphone or line-in port; in this case, you can run a line directly from the playback device to this port. Conversely, if your computer has a headset jack port (a port that accepts an all-in-one stereo headphone or microphone TRRS jack), you will need to use a special adapter to separate the microphone channel from the headphone channel (Figure 5a), then plug your playback device into this separated microphone channel (Figure 5b).

© Government of Canada, Canadian Heritage Information Network. 135044-0014
Figure 5a. Recording a single audio channel using a laptop’s onboard audio hardware and a simple (shoebox) tape player. Keep the original media if you use a set-up such as this.
© Government of Canada, Canadian Heritage Information Network. 135044-0015
Figure 5b. Detail of a cable (used in Figure 5a set-up) designed to separate headphone and microphone signals that are commonly combined in a laptop’s headset (TRRS) port. Note that the microphone channel is a single (mono) audio channel, so stereo cannot be captured with this method.
Software selection
Once an audio connection has been established from a playback machine to your computer, software will be required to detect, process and store the signal. The examples described in this guide are based on Audacity, a free and open source digital audio capture and editor package. However, other solutions exist such as Sound Forge, WavePad Audio Editor and Adobe Audition. CHIN has not performed a comparative analysis on any of these packages and, therefore, does not endorse any package over another.
Digitization workflow overview
There are nine major steps to any digitization initiative.

© Government of Canada, Canadian Heritage Information Network. 135044-0016
Figure 6. Nine steps in a digitization workflow.
Description of Figure 6
The diagram outlines the nine steps in the digitization workflow:
- Step 1: Select materials
- Step 2: Evaluate condition
- Step 3: Catalogue and create metadata
- Step 4: Prepare for digitization
- Step 5: Digitize
- Step 6: Post-processing
- Step 7: Quality review
- Step 8: Archive
- Step 9: Publish
Step 1: Select materials
This step is generally done upfront before the digitization process. Use the criteria set out in your museum’s digitization policy to select and prioritize items for digitization. Selective sampling can be used as a first step where holdings are too great to be digitized in a short timeframe. Additional guidelines can be found in the UNESCO/PERSIST Guidelines for the Selection of Digital Heritage for Long-Term Preservation (PDF format). While these guidelines are intended to prioritize which existing digitized material should be preserved, the criteria also apply well to material not yet digitized.
Step 2: Evaluate condition
This step consists in determining which issues exist with the materials before recording. Consult the “Magnetic Tapes” section of CCI’s publication Remedies for Deteriorated or Damaged Modern Information Carriers (PDF format) if any of the following are present:
- binder flaking of the tape base (flecks of magnetic material in the tape container/box)
- deterioration of the tape base
- breaks in the tape
- wrinkles (cinching or buckling), edge damage (long or rippled edges) and other deformations
- blocking (layer to layer adhesion)
- scratches
- erasure of content on tape
- print through (magnetic signal transfer from one layer of tape to the next)
- dirt/debris
- mould
- poor-quality tape pack (issues with how the tape appears wound on the reel)
- deterioration or loss of lubricant (high friction or scratching, squealing on playback)
If any of these issues are present, follow the CCI guidelines to address them prior to digitizing content.
Step 3: Catalogue and create metadata
Generally, several objects are catalogued before digitization begins.
For museum environments, digitized copies are referenced by the catalogue record of the original analogue recording, and this may already be documented in the museum’s collections management records. If the original object is being deaccessioned following its digitization, update the existing record to reflect the new digital object.
Whether the original object is being deaccessioned or not, ensure that a record of the original object exists in your collections management system (CMS), and record the catalogue number for that record in the filename of the new digital recording. By doing this, you will be able to quickly refer to the file from the collections management record and to the record in that file. For further information on cataloguing practices in museum environments, you can consult the CHIN Guide to Museum Standards. File naming will be discussed further in the sections Step 5: Digitize and Step 8: Archive.
Step 4: Prepare for digitization
Generally, several objects are prepared before digitization begins in order to create a buffer of items ready for digitization. The preparation stage is then balanced with other activities in the workflow to ensure this buffer is always present.
Complete all conservation treatments prior to digitization preparation.
Workspace preparation
As part of this workflow step, a workspace must be prepared. This space should have three sections: a staging area where objects being prepared for digitization can be labelled and organized; a digitization area complete with all hardware necessary to reproduce the recordings; and a post-production area for original objects that have not yet been returned to the collection or that need to be deaccessioned. The workspace should:
- be away from high traffic, direct sources of heating and direct sunlight;
- be large enough to carry out all digitization activities;
- be free of dust and dust-collecting surfaces; and
- allow for vertical storage of all analogue electronic media.
As materials may stay in the digitization workspace for an extended period of time, this area should also be temperature and humidity controlled. The temperature should not exceed 23°C, and, at this temperature, the ideal relative humidity (RH) should be 20%. If lower temperatures are used, the ideal RH increases. Table 1 contains three examples of the ideal temperature and RH for a workspace dedicated to the digitization of analogue electronic audio media.
| Temperature | RH |
|---|---|
| 23°C | 20% |
| 17°C | 30% |
| 11°C | 50% |
Equipment and software set-up
At this point of the workflow, the playback and digitization hardware need to be set up. A set-up using an advanced ADC has already been described in the Equipment selection and set-up section (Figure 2a), and this configuration will be used throughout the guide’s examples.
In addition to setting the equipment up as described, check the tape’s head azimuth settings as per Technical Bulletin 30 The Digitization of Audiotapes. This step may need to be skipped with lower-end playback equipment (particularly compact cassette equipment) as azimuth adjustment on such devices may not be possible. Consult the tape deck operator’s manual where possible.
Tape player heads should also be cleaned at the beginning of any recording project using a cotton swab or microfibre cloth and isopropyl alcohol of 91% or higher. Do not use rubbing alcohol. Dampen the cloth or swab and then lightly rub it over the recording head surface. Be careful to clean only the tape head and not to touch any rubber components. Do not clean the head more frequently than once every few months or when dirt on the head is visible.
In addition to setting up playback equipment and hardware, download an audio recording software or application such as Audacity.
Additional information on playback equipment set-ups can be found in the “Playback equipment and set-up” section of Technical Bulletin 30.
Organization and labelling of items to be digitized
Also as part of step 4, items must be identified and organized. Introduce items into the digitization workspace staging area in batches, using the easier of the following two methods or organization (or a hybridization of the two):
- by media type to simplify the playback process or
- by collections to simplify the documentation.
Label each item by attaching a temporary sticky note to the tape housing or case; the note should contain the following information:
- object ID (catalogue number)
- name of the object
- short description of the object
- estimated time of the recording (if known)
- codec and file format (wrapper) to be used
- bit depth to use
- sample rate to use
- number of audio channels (mono, stereo or other)
Information can be eliminated from the label where a parameter is constant (for instance, when always recording to the same file format).
Step 5: Digitize
The following example is given for digitizing a stereo recording on a compact cassette audiotape. Before proceeding with the digitization in Audacity, review the detailed information found in the “Playback of tape for digital capture” section of Technical Bulletin 30. Once this information has been reviewed and applied where necessary, complete the following tasks in this order:
- Turn all equipment on.
- Load a cassette into the cassette deck.
- Re-tension the tape by pressing fast forward to run the tape all the way to the end; then rewind it to the beginning.
- On the computer that will be used to capture the digitized signal, turn off any unnecessary applications so as not to interrupt the capture process.
- Open the Audacity application on the Windows computer.
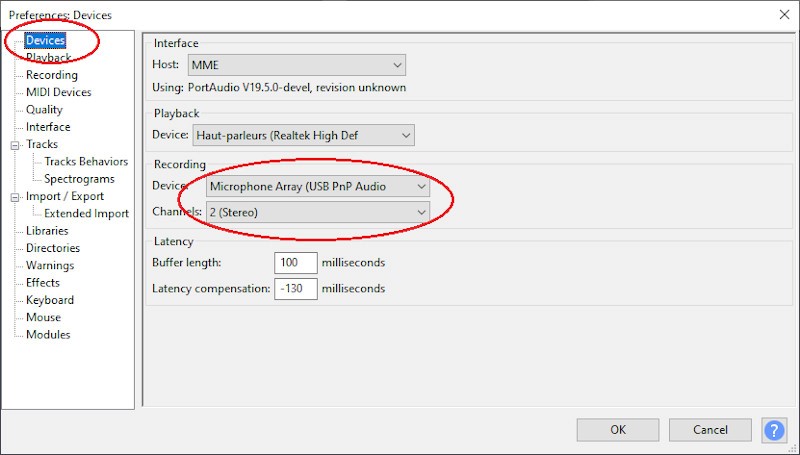
- Verify all settings in Audacity as follows:
- Select “Edit” | “Preferences” | “Devices” and set the correct input source and number of channels, as per Figure 7a.
- Select “Edit” | “Preferences” | “Quality” and set the correct sample rate and sample format, as per Figure 7b. Note that in some cases, your software may allow you to set sample rates and bit depths that exceed the capabilities of your hardware. Be sure to verify the technical specifications of your equipment (sound card or ADC) beforehand.
© Government of Canada, Canadian Heritage Information Network. 135044-0018
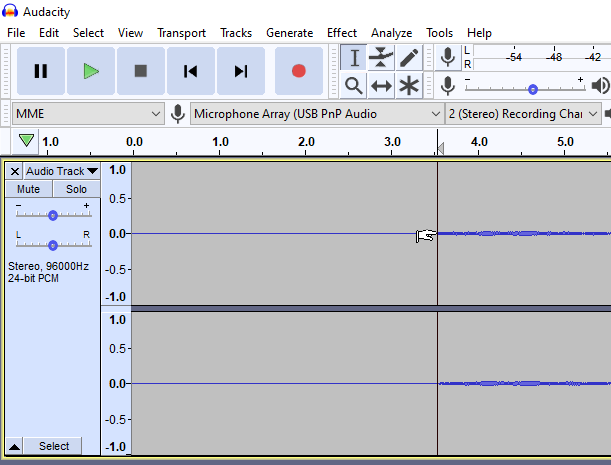
Figure 7a. Screenshot of Audacity. Ensure the correct setting for the audio source. In this case, an ADC is plugged into the computer’s USB port and the recording is made using 2 (stereo) channels.

© Government of Canada, Canadian Heritage Information Network. 135044-0020
Figure 7b. Screenshot of Audacity. Ensure the sound quality settings are correct. In this case, the sample rate is set to 96 kHz and the bit depth (sample format) to 24 bits.
- In Audacity, press the “Pause” button (player button with 2 vertical lines), then the “Record” button (player button with a red circle). This causes Audacity to read audio signals from the current input source without actually recording the stream.
- Verify the audio input source, and correct it if necessary. Noise in the room should not be picked up by the audio channel. If your own voice or other room noises are showing in Audacity’s recording levels, isolate the problem. Possible issues include the recording device not being correctly set or a microphone in the tape deck picking up sound inadvertently. If the problem is determined to be the tape player, a new deck may be required.
- Set recording levels by raising or lowering the recording volume levels in Audacity (the slider bar with the microphone icon). Input levels should be set so that the loudest sound on the tape approaches but never reaches the maximum (0dB) level. Noise peaks will appear as green bands when the input is set to lower levels, and yellow or red bands when it is set to higher levels. If the recording levels are set too high, the audio will be clipped. That is to say, the recorded sound wave for louder sounds will be misshapen and louder sound information will be lost. If you find that the slider for the recording levels in Audacity must be moved to (or close to) the maximum position, then the output levels (volume) from the tape deck are too low. If this is the case, raise the output levels from the tape deck and readjust the recording levels. Once levels are set, stop the tape and rewind it to the beginning.
- Press the “Pause” button in Audacity a second time to begin recording. Wait five seconds; then press “Play” on the tape deck. Observe the audio channel (called an “audio track” in Audacity) to ensure that the recording process is taking place. Let the tape play to the end. Once the tape has played, press the “Stop” button in Audacity (player button with a square icon) to stop the recording process.
- Trim off the dead sound from the beginning and end of the file. This is the only form of editing recommended at this stage (the steps for this process are described in the Trimming section). Save the resulting recording in a recommended preservation format without further edits. In Audacity, this is done by selecting “File” | “Export” | “Export as WAV.” Save as 24-bit L/PCM. The resulting copy should never be edited and should be saved as the “Preservation master” (sometimes also called an “Archival master”). To ensure that this file is always recognized as the preservation master, you may give a prefix to the filename such as “PRES.” The filename should also include the CMS record number for this content. Use leading zeros if the record number has fewer digits than other record numbers in the system. Save the file in a location unique to preservation master files. For instance, an appropriate path and filename for a recording of object #3451 might be:
c:\Digital_Objects\Audio\Preservation_Master\PRES_003451.WAV
When you export audio to a file in Audacity, you may be presented with an “Edit Metadata” dialogue box. Fields in this box can be added or removed to suit the nature of the recording, but all content added in this box will be embedded in the header of the audio file. While it is a good practice to enter some basic information in this box (for example, to describe the title of the recording), use your CMS as a primary source for descriptive metadata.
Step 6: Post-processing
Once a preservation file has been created, it should not be modified in any way. To produce a file that is more usable, a production version (sometimes called a “production master” or “edit master”) should be created during the post-processing stage. The following processes are common in the creation of a production version, but they are not necessary.
Noise reduction filtering
Noise reduction filters were originally marketed as features on analogue recording and playback devices, the most common of these being the Dolby noise reduction system. As the filtering process can now be applied to an audio track during the post-processing stage, it should be done only at that point. Noise reduction inevitably involves the loss of some signal, which is why it should not be done during the original digitization step.
To apply noise reduction to a recording in Audacity, select a few seconds of a recorded sample area where the track is supposed to be silent (such as the lead-up to a song or during a pause in a conversation). A simple way of selecting a section is to left-click on a location and then drag it (with the left mouse button held down) to the end of the desired selection (Figure 8).

© Government of Canada, Canadian Heritage Information Network. 135044-0022
Figure 8. Selecting a silent area of a recording. Left-click the mouse and drag it. Note the hand pointer indicating the edge of the highlighted area.
Once the silent sample area has been selected, click on “Effect” | “Noise Reduction” and a noise reduction dialogue window will pop up (Figure 9).

© Government of Canada, Canadian Heritage Information Network. 135044-0024
Figure 9. Screenshot of noise reduction dialogue window.
Click on “Get Noise Profile” to allow the filter to identify what constitutes residual noise. As soon as this is done, the dialogue box will disappear.
Double click on the audio track to select the entire recording; then click on “Effects” | “Noise Reduction” again. Note the three slider bars (also visible in Figure 9) that can be adjusted to determine the level of noise reduction desired. You are invited to explore the use of these sliders as well as the “Preview” and “Residual” features since they are out of scope for this guide. Simply pressing “OK” will eliminate the noise level that was identified by the application as being optimal, based on the sample already taken.
Trimming
This process involves the removal of audio from the beginning or end of a recording. It is typically done if there is an excessive amount of time before or after the recording in which there is silence. Follow these steps to trim the beginning of a recording:
- With the recording loaded in Audacity, zoom into the audio track to identify where the first part of the desired sound to retain actually begins.
- Mark this location by left-clicking it. This creates a vertical line that marks the starting point of the audio to be edited (Figure 10).
- With the left mouse button still held down, drag your mouse to the left until all of the recording to the left (before) your selected location has been highlighted (Figure 11).
- Press the delete key on your keyboard to remove the greyed-out area. The audio has now been trimmed (Figure 12).
© Government of Canada, Canadian Heritage Information Network. 135044-0026
Figure 10. Clicking on zoomed-in area to mark the beginning of the sound track to be kept.

© Government of Canada, Canadian Heritage Information Network. 135044-0028
Figure 11. Highlighted area that will be deleted.
© Government of Canada, Canadian Heritage Information Network. 135044-0030
Figure 12. Audio is now trimmed.
Typically, a lead-up involving a few seconds of silence is desired. The exact amount of time can be normalized (for example five seconds) in the following manner:
- With the vertical marker still at the first part of the track (it will still be there if you just completed the trimming steps above), select “Generate” | “Silence.” A pop-up window will allow you to indicate how much silence you wish to generate (Figure 13). The default is 30 seconds, and this should be changed to the desired amount of time (such as 5 seconds). Click “OK” and the desired amount of silence will be added at the location of the marker.

© Government of Canada, Canadian Heritage Information Network. 135044-0032
Figure 13. Screenshot of pop-up window for generating silence.
Note that steps to trim the end of a recording follow the same pattern.
Normalizing audio range
Recordings that have a large range of volume can be difficult to listen to, either because more quiet sections are not properly heard or because louder sections can be overwhelming. These peaks in volume can be levelled out by normalizing the range (making quiet sections more audible and louder sections quieter). This can be done in one of two ways, the simpler being the “Normalize” effect.
To normalize your audio track, select the area (left-click and drag) where the effect is to be applied; then select “Effect” | “Normalize.” A pop-up window will appear with default options (Remove DC offset and Normalize peak amplitude to −1.0 dB). Click the “OK” button, and the effect will apply. The second method is to use the “Compressor” effect, which is not detailed here. Readers can explore this option on their own.
Labelling and saving separate segments
Labelling and saving separate segments are typically done in a single process if the recording has multiple segments (such as multiple songs) which are likely to be listened to separately. The first step is to identify the breaks between each segment, mark them, then add a label at that location. To do this, click on the track once at the location where the break must occur; then select “Edit” | “Labels” | “Add label at Selection.” A label (in the form of a small text box) will appear at the location of the break along with a keyboard cursor allowing you to give the label a name (Figure 14). Create a label that is appropriate for the title of the sound segment following that break and add the prefix “PROD_” to the beginning of each label name. This is done to ensure the file is understood as a “production” file type, rather than a “preservation master” or “access” file. In lieu of “PROD,” another prefix such as “EDIT” or similar may be used to suit your institution’s own schema. Further information about this practice can be found in the section Saving production files.

© Government of Canada, Canadian Heritage Information Network. 135044-0034
Figure 14. Marking segments and adding labels.
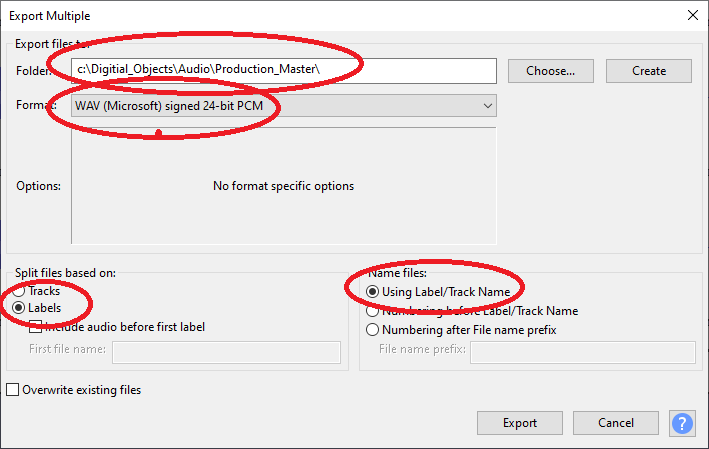
Repeat this process for all segments in the recording. Once labels have been added, the segments can be exported by selecting “File” | “Export” | “Export Multiple….” A dialogue box will appear for exporting multiple segments at once (Figure 15). Ensure that there is a path name for all audio segments and that the format is set to 24-bit PCM WAV. In addition, make sure that files are split files based on “Labels” and that filenames are based on the label names. Once these parameters have been set, click “Export.”
© Government of Canada, Canadian Heritage Information Network. 135044-0036
Figure 15. Screenshot of export dialogue box. Important settings are circled.
Once “Export” has been selected, a metadata template will pop up for each track, and fields will be automatically populated. Verify the template for each individual segment, edit any necessary fields and then select “OK.”
Saving production files
Regardless of whether labelling and saving multiple segments is part of your production process or not, production files should be saved in a manner similar to that of preservation masters. That is to say, a prefix such as “PROD” (or similar) should be used, and all such files should be saved to a common area. For instance, an appropriate path name for the production version of object #3451 might be:
c:\Digital_Objects\Audio\Production_Master\PROD_003451.WAV
Note that some institutions may use a different name for production masters (such as Edit Master or similar). This is fine as long as there are three consistently used names for the three different file types. The first two types are preserved for long-term access, these being the “Preservation Master,” which has minimal edits to it, and the second being the “Production Master,” which has a number of standards edits to “clean” the file up, and a third type that is not necessarily preserved, and which may be saved in a lighter and lower quality format, often referred to as an “access,” “derivative,” “proxy” or “working” copy.
Step 7: Quality review
Quality review is done on an ongoing basis and is initially carried out for all content produced. As experience is gained and the workflow becomes routine, the sampling of the materials is used to spot check the work. Items to review during this stage include:
- ensuring that all the desired content is digitized;
- ensuring there are both preservation master (archival) files and production (post-processing) copies made and that these are correctly named and stored in the proper locations;
- comparing collections record numbers to the filenames and the audio content to ensure all three match;
- reviewing metadata in the collections management record to ensure it is complete and correct, including any updates for deaccessioned analogue content;
- listening to the beginning and ending of audio files to ensure full recordings of the correct content were digitized; and
- reviewing technical metadata for correct file format, codec, sample rate and bit depth.
Reviewing technical metadata for correct sample rate and bit depth requires an understanding of what a bit rate is and how it is calculated. A bit rate indicates the number of bits that are streamed per second as it is recorded or played. It is calculated in the following way:
Bit rate = (number of audio channels) × (sample rate) × (bit depth)
Thus, a stereo recording with a sample rate of 96 kHz and a bit depth of 24 bits will have a bit rate of:
2 × 96,000 × 24 = 4,608,000 bits per second (b/s) or 4,608 kb/s
The bit rate of an audio file can be found as embedded technical metadata and can be viewed in a number of ways. The simplest way is to right-click on an audio file in a Windows browser and then select “Properties” | “Details.” The bit rate will appear in the “Audio” section of this detailed information.
Step 8: Archive
An organization that manages a formal digital archive is likely to preserve digital assets using a system that is compliant with the Open Archival Information System (OAIS) standard. For museums, this is not practical unless they are also running a formal digital archive. Rather than formally archive their digital content, museums are advised to use their existing CMS in conjunction with best practices suitable for museum environments. These have been summarized in the document Digital preservation recommendations for small museums, which was originally devised for smaller institutions but is proving to be suitable for larger ones as well.
Additional general recommendations (that focus on digital preservation and not specifically digital archiving) can be found in the following documents:
- InterPares Project, Creator Guidelines. Making and Maintaining Digital Materials: Guidelines for Individuals (PDF format)
- InterPares Project, Preserver Guidelines. Preserving Digital Records: Guidelines for Organizations (PDF format)
- National Digital Stewardship Alliance, Levels of Digital Preservation
Understanding storage space
Before determining what physical carriers will be used for storing your preservation and production files, you must estimate the required storage space. As WAV files are not compressed, calculation of their size is fairly straightforward and has, in part, been introduced in the discussion on bit rates in the section Step 7: Quality review. The size of a WAV file can be calculated as:
WAV file size in bits = bit rate (in seconds) × run-time (in seconds) + file header size (which is negligible and will be dropped from the formula)
Given that the bit rate equals the number of audio channels multiplied by the sample rate and the bit depth, we can expand the formula to the following:
WAV file size in bits = (number of audio channels) × (sample rate) × (bit depth) × (run-time in seconds)
| File size specification | Equation | Notes |
|---|---|---|
| Bits | 2 × 96,000 × 24 × 1,800 = 8,294,400,000 bits | 1,800 is the number of seconds in 30 minutes |
| Bytes | 8,294,400,000 ÷ 8 = 1,036,800,000 bytes | 1 byte contains 8 bits |
| Kilobytes | 1,036,800,000 ÷ 1,024 = 1,012,500 KiB | KB in Windows |
| Megabytes | 1,012,500 ÷ 1,024 = 989 MiB | MB in Windows |
| Gigabytes | 989 ÷ 1,024 = 0.96 GiB | GB in Windows |
Note that the above conversion to KB, MB and GB is for a Windows PC operating environment, which uses traditional definitions that are multiples of 210 (or 1024) bytes. The International Engineering Consortium has since metricized the definition of KB, MB and GB to mean multiples of 1000 bytes, and some operating systems have followed suit. If you are not using Windows, verify which system your operating system uses.
If you wish to avoid these calculations, you may refer to the table below for some file size estimations of common recording settings:
| Number of channels | Sample rate of 48 kHz | Sample rate of 96 kHz |
|---|---|---|
| Single channel (mono) | 0.5 GB | 1 GB |
| 2 channels (stereo) | 1 GB | 2 GB |
Using this table, a 30-minute stereo recording, for instance, with a bit depth of 24 and a sample rate of 96 kHz, would yield a file that is 2 GB per hour × 0.5 hours = 1 GB.
Note that WAV files have a maximum size of 4 GB (typically two to four hours depending on the number of channels and sampling rate). With the exception of some reel-to-reel tapes, this is typically sufficient for digitizing electronic analogue media. Digitization of longer contiguous recordings requires breaking the recording into multiple files, which is out of scope for this guide.
The above calculations will help you establish the total file space required for a single copy of your preservation files. The table can quickly tell you, for instance, that 1000 hours of run-time in your analogue holdings will translate to 2000 GB or 2 terabytes (TB), when digitized at 96 kHz stereo. However, space must also be considered for additional copies and versions. The production copies (which must also be preserved) will double the space requirements, and based on the practices laid out in Digital preservation recommendations for small museums, all these files should be backed up and retained annually, creating annual copies that are never overwritten. Further to this, all this information should be copied onto at least three separate physical carriers.
Thus, after the fifth year, you would calculate total required file space as:
Size of preservation files × 2 production versions × 5 annual copies × 3 separate carriers
If, for instance, the total file size of the preservation copies of audio files amounts to 100 GB, you would need by the fifth year:
Required 5-year storage capacity = 100 GB × 2 production versions × 5 annual copies × 3 separate carriers
= 1,000 GB (1 TB) × 3
Accordingly, three external hard drives of 1 TB each would suffice.
Keep in mind, however, that these calculations are for long-term storage requirements only. They do not include file space requirements for access (working) copies, software to produce or access this content or anything else. Such items typically take up less space but should nevertheless be factored into the requirements of your working drive.
Once you have determined the needed space for all your files, you can select the physical carriers. Hard drives are commonly recommended as a long-term storage solution, but they will need to be refreshed to newer drives on a regular basis. Linear tape is the most financially viable for voluminous amounts of data, although it is not practical for quick access or data management, and it, too, must be refreshed regularly. Cloud storage services offload management of the physical carrier to the service provider, but they are the most expensive of the options considered here, and alternate copies should be kept locally (onsite) by the museum if cloud services are being used. Solid state drives (flash media), while still expensive and not yet tested in the long term, do appear to wear well under artificial aging, and may prove to be a viable long-term storage solution. If storage requirements exceed the capacity of single hard drives or solid state drives, another option is to pool drives so that they behave as a single volume. The ability to do this is common in most operating systems; in Windows it is managed through the storage space feature.
Consult Digital preservation recommendations for small museums for further information on best practices.
Step 9: Publish
While detailed information on this step is out of scope for this guide, it should not be overlooked, as a primary goal of digitization is to improve access to your holdings. Some online CMS allow the sharing of multimedia such as audio and video. As functionality is constantly evolving, we encourage you to investigate which of these systems have such functionality at any given moment. For featured components of a collection, social media may also be used, as virtually all such platforms support the sharing of audio and video. Always clear the copyright of any content before publishing it, and be sure to include the provenance, copyright and usage rights information with that content.
Acknowledgements
Special thanks for their contributions to Bruce Covington, Document Imaging Solutions Centre, Public Services and Procurement Canada, and Rob Gemmell, Provincial Archives, New Brunswick.
Glossary
- access file
- Also known as a derivative or working copy. Any copy of a file that does not require long-term preservation and that can be freely edited without recourse to the preservation of the original information.
- analogue to digital audio converter
- A hardware device that receives analogue audio signals and converts them to a digital signal. Also referred to as an analogue to digital converter (ADC).
- audio channel
- A representation of sound having a unique source or destination. Stereo audio, for instance, uses two audio channels. Also referred to as an audio track.
- audio track
- A representation of sound having a unique source or destination. Stereo audio, for instance, uses two audio channels. Also referred to as an audio channel.
- binder (tape binder)
- Adhesive material that bonds components of a tape together.
- bit
- A binary digit having the value of either 1 or 0.
- bit depth
- The number of bits used to represent a single datum (such as the colour of a pixel or the location of a sound wave).
- bit stream
- A sequence of digital bits used to convey time-based media such as audio, video or both.
- cassette tape
- A closed cartridge containing a tape on two reels, of various formats, typically for audio.
- codec
- A set of instructions (or method) to encode or decode information to and from a digital representation. Software that carries out this instruction set is also referred to as a codec.
- container
- A wrapper that typically includes more than one type of time-based media.
- decibel (dB)
- A measurement of (typically sound) wave amplitude or loudness.
- derivative file
- Also known as an access copy or working copy. Any copy of a file that does not require long-term preservation and that can be freely edited without recourse to the preservation of the original information.
- Dolby noise reduction
- A noise reduction process used on analogue recording and playback devices.
- driver (software driver)
- Software that serves as an interface between a hardware device and a computer.
- dynamic range
- The range of sound amplitude (volume) expressed (or that can be expressed) over the length of an audio track.
- eight-track
- An analogue electronic tape audio format having eight audio tracks running the length of the tape.
- gibibyte (Gib)
- The International Engineering Consortium’s term for 10243 bytes (the original definition, and that still used by Windows for gigabyte).
- gigabyte (GB)
- The original definition (and that used by Windows, and thus this guide) is 1024 megabytes.
- hertz (Hz)
- A unit of frequency over 1 second.
- kibibyte (KiB)
- The International Engineering Consortium’s term for 1024 bytes (the original definition, and that still used by Windows for kilobyte).
- kilobytes (KB)
- The original definition (and that used by Windows, and thus this guide) is 1024 bytes.
- kilohertz (kHz)
- Equal to 1000 hertz.
- linear pulse code modulation (LPCM)
- A form of pulse code modulation: a method (a codec) for encoding and decoding analogue sound to and from a digital representation.
- National, Provincial, Territorial Archivists Conference (NPTAC)
- A body responsible for forming the NPTAC Audio/Video Working Group.
- mebibyte (MiB)
- The International Engineering Consortium’s term for 0242 bytes (the original definition, and that still used by Windows for megabyte).
- megabyte (MB)
- The original definition (and that used by Windows, and thus this guide) is 1024 kilobytes.
- personal computer (PC)
- A term accepted to mean a computer running the Microsoft Windows operating system.
- pulse code modulation (PCM)
- A method (a codec) for encoding and decoding analogue sound to and from a digital representation.
- preservation file
- A file with original, unedited material that is to be preserved for long-term access.
- production file
- A file with edited material that is to be preserved for long-term access. This is typically the file that is used to make derivative, working or access copies.
- RCA connector (RCA cable / RCA jack)
- An analogue audio/video connector, each carrying one signal, commonly found on analogue A/V equipment.
- reel-to-reel
- An electronic tape format (best known for analogue audio) in which tape is spooled onto an open reel and transferred to a second reel during recording or playback.
- sample rate
- The frequency with which something, such as a sound wave, is sampled.
- tebibyte (TiB)
- The International Engineering Consortium’s term for 10244 bytes (the original definition, and that which is still used by Windows for terabyte).
- terabyte (TB)
- The original definition (and that used by Windows, and thus this guide) is 1024 gigabytes.
- trimming
- Removing a section of an audio track, particularly prior to or after the desired recording.
- TRRS jack
- An audio jack consisting of a tip, two rings and a sleeve, each separated by black insulators. TRRS jacks are commonly used for headsets (headphone/microphone combinations).
- TRS jack
- An audio jack of various sizes, consisting of a metal plug broken into three segments (tip, ring and sleeve), each segment being separated by an insulator.
- TS jack
- An audio jack consisting of a tip and a sleeve separated by a black insulator. TS jacks typically carry one channel of information only.
- working file
- Also known as an access copy or derivative copy. Any copy of a file that does not require long-term preservation and that can be freely edited without recourse to the preservation of the original information.
- wrapper
- Additional information (metadata) that encapsulates a bit stream.
Bibliography
Bieman, E. Digital preservation recommendations for small museums. Ottawa, ON: Canadian Heritage Information Network, 2018.
Bieman, E., and W. Vinh-Doyle. National Heritage Digitization Strategy – Digital Preservation File Format Recommendations, revised. Ottawa, ON: Canadian Heritage Information Network, 2019.
Iraci, J. Electronic media collections care for small museums and archives. Ottawa, ON: Canadian Conservation Institute, 2020.
Iraci, J. “Suitability of Flash Media for the Long-Term Storage of Information.” Restaurator. International Journal for the Preservation of Library and Archival Material, 40,2 (June 2019).
Iraci, J., R. Hess and K. Flak. The Digitization of Audiotapes, revised. Technical Bulletin 30. Ottawa, ON: Canadian Conservation Institute, 2020.
Oetzmann, T., D. Mazzoni, et al. “Sample Workflow for Tape Digitization.” [Tutorial] Audacity 3.3 Reference Manual. N.p.: Audacity, 2023.
National, Provincial and Territorial Archivists Conference Audiovisual Preservation Working Group and the National Heritage Digitization Strategy Steering Committee. Recommendations on Preservation Files for Use in the Digitization of Analog Audio and Video Recordings and Motion Picture Films (PDF format). N.p.: National, Provincial and Territorial Archivists Conference Audiovisual Preservation Working Group in partnership with the National Heritage Digitization Strategy Steering Committee, 2018.
Further reading
Canadian Heritage Information Network. Digital Preservation Toolkit, revised. Ottawa, ON: Canadian Heritage Information Network, 2021.
Carey, S., et al. Capture Your Collections: A Guide for Managers Who Are Planning and Implementing Digitization Projects, revised. Ottawa, ON: Canadian Heritage Information Network, 2020.
Choy, S., et al. UNESCO/PERSIST Guidelines for the Selection of Digital Heritage for Long-term Preservation. N.p.: International Federation of Library Associations and Institutions, 2016.
© Government of Canada, Canadian Heritage Information Network, 2024
Published by:
Canadian Heritage Information Network
Department of Canadian Heritage
1030 Innes Road
Ottawa ON K1B 4S7
Canada
Cat. No.: CH44-184/2024E-PDF
ISBN 978-0-660-69118-3
Page details
- Date modified: