Biological test method for measuring survival of springtails exposed to contaminants in soil: appendix I
Appendix I
Aspirator Construction and Usage
Equipment
Parts
- 125 mL screw top glass jar with metal ring and lid
- Borosilicate disposable pipette 5 mL (e.g., Pyrex 7077)
- Borosilicate disposable pipette 1 mL (e.g., Pyrex 7077)
- Inert flexible tubing (5/16” (~8 mm) inner diameter) - Note: Imperial units are provided as reference to specific tools; approximate metric equivalents are also provided.
- 200 µL disposable pipette tip
- Faucet Aspirator (e.g., Nalgene 6140-0010 Faucet Aspirator Vacuum Pump, Polypropylene, 3/8 ” [~9.5 mm] NPT)
- Cheesecloth
- Parafilm®
- Elastic band
Tools
- Electric Drill with 3/16”, 5/16” (~5 and 8 mm) drill bits
- Hot Glue/Non Toxic Silicone (e.g., GE Silicone II)
- Glass cutter
- Bunsen burner
- Pliers
Construction
- Heat a 1 mL borosilicate pipette with a Bunsen burner until it is pliable. Use pliers to gently bend it to 90°-120° angle.
- Cut the bent 1 mL pipette ~8 cm past the bend and 4.5 cm from the bend on the opposite end using a glass cutter.

This is a photograph of a 1 mL pipette that has been cut to approximately 12.5 cm in length. The pipette has been bent to a 45 degree angle 8 cm from one end.
- Place the pipette tip on the 8 cm end and wrap the joint with Parafilm® to make an airtight seal. The pipette tip may need to be trimmed to make it wide enough to collect organisms without damaging them.

This is a photograph of same modified pipette mentioned in I-1 with a 200 µL disposable pipette tip affixed to the longer part of the pipette with Parafilm.
- Cut a 4 cm piece of unbent 5 mL pipette.
- Drill 2 holes (5/16” and 3/16”) on opposite ends of the metal lid (~15 mm from the edge).

Details
This is a photograph of the metal lid to a 125 mL screw top glass jar. Two holes (one approximately 5 mm in diameter and the other approximately 8 mm in diameter) have been drilled into opposite ends of the lid each approximately 15 mm from the edge.
- Place the metal ring over the lid and then insert the bent pipette into the 3/16” hole and the 4 cm pipette piece into the 5/16” hole. Note: Depending on the angle of the bent 1 mL pipette, the ring may be able to be placed on the metal lid afterwards.
- Using hot glue or non toxic silicone, form an airtight seal between the pipette pieces and the metal lid. Allow the apparatus to dry for ~24 hours before use.

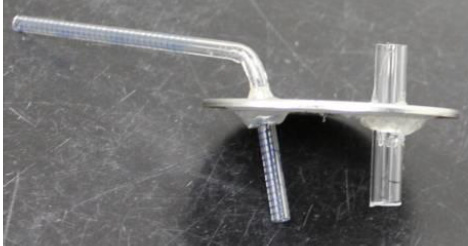
This is a photograph of the aforementioned metal lid and pipette from I-1 and I-3. The shorter side of the pipette has been inserted into the smaller hole in the lid and secured with silicone. A 4 cm section of 5/16” flexible tubing has been inserted into the larger hole and secured with silicone.
- Cut a piece of cheesecloth and fold several times. Place this over the 4 cm pipette piece on the underside of the metal lid and secure with an elastic band.

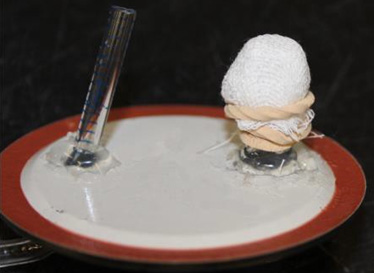
This is a photograph of the bottom of the aforementioned metal lid with several layers of cheesecloth covering the bottom of the flexible tubing and held in place with an elastic band.
Aspirator Usage
- Attach the aspirator to a faucet aspiration unit using inert tubing. Screw in a 125 mL glass jar using the metal ring. Aspirated springtails will be collected in this vessel.

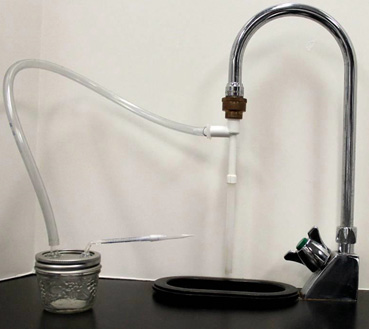
This is a photograph showing the final assembly of the device. The lid has been screwed onto a 125 mL glass jar and the flexible tubing has been attached to a faucet aspiration unit via inert tubing.
- Set the aspiration strength with the flow of water from the tap. When aspirating springtails, always use the minimum strength possible to prevent organism stress.
Separation of male and female organisms
- A thin layer (~5 mm) of plaster of Paris culture substrate should line the 125 mL jars utilized in separating male and female organisms from an age-synchronized culture before test initiation. Two jars are required, and should be labelled to distinguish the male and female collections.
- Aspirate a small sample of males or females (~20) and remove the jar to check the health of the aspirated organisms. If the organisms appear healthy (i.e., uncurled, actively moving around), then continue to aspirate more springtails. If the organisms appear unhealthy, then reduce the strength of aspiration before continuing.
- After ~5 minutes, alternate between collecting males and females. This will prevent excessive stress on the test organisms from the aspiration process.
- Once a sufficient number of organisms have been collected, the jars should be closed with a metal lid and left for a minimum of 10 minutes.
- Check each jar and remove damaged or incorrectly separated springtails from each jar with a paintbrush.
Collection of organisms for addition to tests
- An unlined 125 mL glass jar should be utilized for collecting organisms for test addition. To increase contrast between the organisms and the background, the bottom of the outside of the jar can be covered with coloured paper or masking tape.
- Randomly aspirate the springtails from the age-synchronized culture (for F. candida), or collect the appropriate number of males and females from pre-separated collections (see 3.2.1).
- Remove the collection jar and verify that the appropriate number of springtails have been aspirated.
- Add the organisms to the test vessel by inverting the collection vessel and tapping them into the test soil. Since the jars are not lined with plaster of Paris, the organisms have no substrate to grip and should easily transfer to the test soil.
- Verify that all organisms have been transferred to the test vessel before attaching the collection vessel to the aspirator for the next aspiration.
Page details
- Date modified: