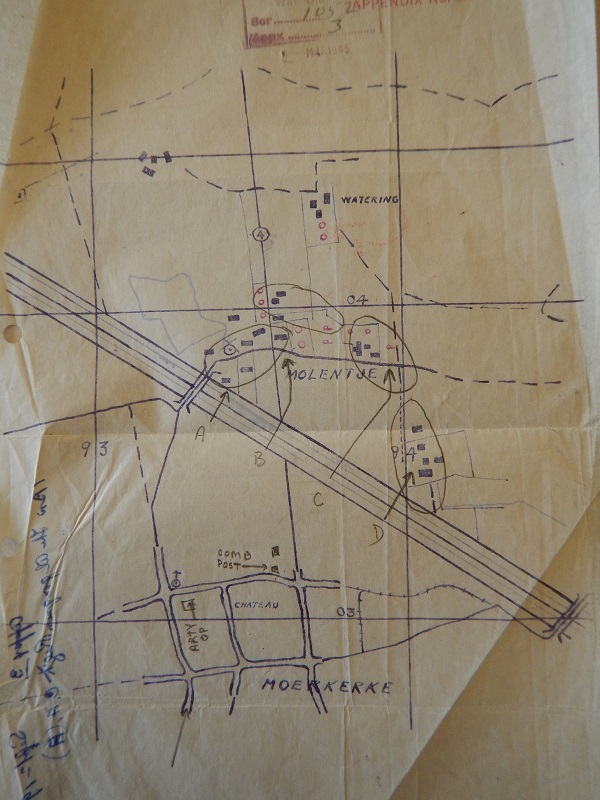
The Battle of the Leopold Canal, September 13 to 14, 1944
The Battle of Leopold Canal was an unsuccessful attempt to form a defensive perimeter around an old bridge site. This would let Canadian soldiers build a new bridge to cross the canals and head north-west towards enemy strongholds.
As part of the preliminary battles leading up to the Battle of the Scheldt, the 4th Canadian Division was tasked to move along the axis of Moerbrugge – Maldegem – Breskens. After the crossing of the Ghent Canal at Moerbrugge, it then planned for the crossing of the Dérivation de la Lys and the Leopold Canal. The area selected for the bridgehead crossing was the hamlet of Molentje, north of Moerkerke..
The unit selected to establish the bridgehead was The Algonquin Regiment. Once on the northern side of the Leopold Canal, the four companies were to advance roughly 200 to 400 meters north, then dig in and form a defensive perimeter around the old bridge site. After establishing the defensive perimeter, engineers would build a new bridge, allowing the brigade to cross the canals and exploit north-west towards enemy strongholds at Sluis and Aardenburg.
Unfortunately, the plan was doomed to fail: a diversion failed to draw the German forces away, the boat launch was late and the artillery support ended too quickly. Many of the paddlers from other regiments assigned to assist The Algonquin Regiment never arrived, forcing the Algonquin troops to move the heavy assault boats across the canal and over the island where many German soldiers fired at them from hidden slit trenches.
After taking as many prisoners as possible, the Algonquins continued across the second canal and arrived exhausted but undeterred on the northern bank. Due to malfunctioning radios and confusion in the dark, “C” company shifted too far west while “D” company moved too far east from their intended positions. A runner established communication between the two companies, who then decided to switch their objectives. This allowed “C” company to hold a firm flank near the canal bank while “D” company moved northwards towards Damweg road.
Meanwhile, “A” company had to spread their force thin to cover the entire left flank of the bridgehead after realising that the western fields were not flooded as they had expected. “B” company moved up the eastern side of the road with difficulty since “A” company’s quick clearing of the various buildings failed to eliminate all the German snipers hiding in the darkened houses.
“B” company had so few uninjured men that they had to tuck in with “A” company’s position at the Damweg and Molentje road junction and leave a single platoon covering the middle of the bridgehead. Under very heavy fire, “D” company moved towards their new position but were never able to connect with “B” company to eliminate the large gap in the middle of the defensive perimeter.
Throughout the night German soldiers utilized the numerous gaps to infiltrate the Algonquins’ positions and by the light of morning on 14 September, all four companies were running low in ammunition while coming under fire from every direction. By noon, it was realised that exploiting the bridgehead was impossible and a thick smoke screen covered their withdrawal.
By that time, the Germans had overrun many of the Algonquins’ forward positions, cutting them off from any possibility of retreat. Artillery fire damaged so many boats that men just stripped down and swam back across the canals. A devastatingly small group straggled back up the southern bank, confident that the enemy’s casualties were just as high and feeling that they had only been beaten because the German 64th Infantry Division had been much larger and better organised than they had anticipated.
Using a combination of historical research and forensic anthropological analysis, the Directorate of History and Heritage of the Department of National Defence has identified the following soldier whose remains were recovered due to modern human activity.
- Duncanson, Kenneth Donald, Algonquin Regiment
Information about casualty identification
Page details
- Date modified:


